How to stretch your fingers
Basics required for this lesson : None
Practice this lesson : None
I often see beginners (here and elsewhere) "complain" (or at least, surprised) at how much our delicate left-hand fingers must stretch to play some chords. Indeed, in the beginning, it is rather difficult to manage to place fingers appropriately, especially if you want to follow the "academic" way specifying that fingers should be placed very close to the fret, which requires them to be even more spread out than if they were just placed randomly on the fret.
Stretching exercise
So, in order to help you develop your finger spread and allow you to place your fingers appropriately on the frets, let me suggest a stretching exercise here. This is a very difficult task at first, it needs to be done very slowly and thoroughly. Beware, though, as this exercise can be painful so do not push yourself - it's supposed to hurt a little bit - but do not go beyond your limit. It will come gradually.
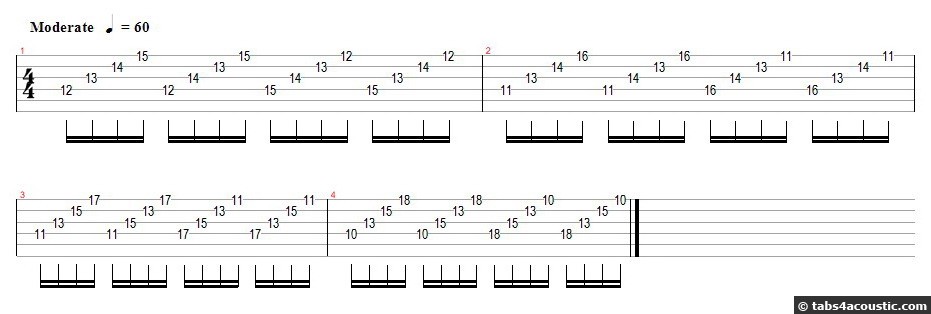
The idea is simple: the goal is to play this "chord" x-x-12-13-14-15. The index on the 12th fret, the middle finger on the 13th, the ring on the 14th and the pinkie on the 15th. No, it's not a real chord, it sounds completely out of tune, and we don't play it with any rhythm. The only goal is that all of the notes sound loud and clear. That alone seems quite easy, but from this chord, we will reverse some of our fingers and spread them out as we go.
Basically, it results in this chord progression (if you play on a folk guitar and you do not have much access to high frets, do the same thing but 3 or 4 frets lower):

In the beginning, stick with the first measure. Start playin these four chords in a smooth sequence, without hurrying too much, making each note sound well. For the fingering, maintain the same fingers: index on the 12th, middle on the 13th (regardless of the string), etc. The goal is to manage playing along with the metronome, not fast but in a steady way, and without any hesitation.
Once you get a smooth progession of these four chords, you can spread the index and the pinkie one fret further each, which corresponds to the second measure, and you can apply the same finger inverting move. Then gradually, as months go by, you can spread your fingers more and more. Do not aim for speed, it is completely irrelevant, but aim for the appropriate technique.
I have only done 4 measures but if you can come to stretch wider than x-x-10-13-15-18, then you'll be doing great!
Tip: if you get to a certain stretch (the 3rd measure, for example) but you can't get passed the next measure, even after several weeks, try moving the chord up to the first frets. Rather than x-x-11-13-15-17, try x-x-9-11-13-15 and continue down the fretboard, as frets widening more and more allow you to keep on spreading your fingers.
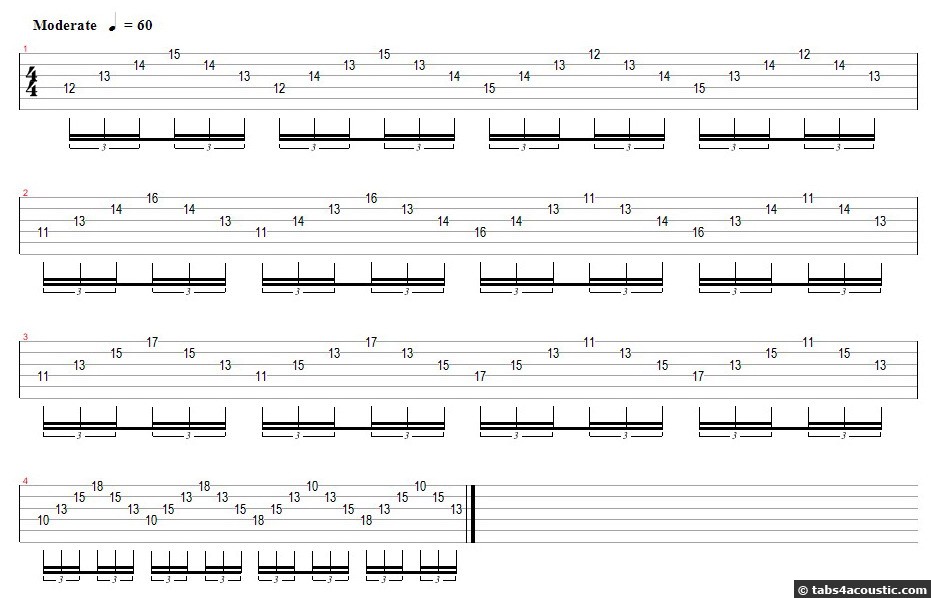
Exemples of arpeggios
To wrap it up, let me give you two examples of arpeggios that you can play (always with a metronome):


