Practicing chord change
Prérequis pour ce cours : How to read and play chords for beginners,
Travailler ce cours : Aucun
In today's lesson we'll see how to work on the chords change, since it usually represents a major issue for beginners. Moreover, it's difficult to play complete songs, even songs for beginners, without feeling a minimum comfortable with this discipline.
This lesson is divided into three parts. The first part will teach us the basics needed to work the chords properly. In the second part, we will learn two tricks that any guitarist should absolutely know, namely the pivot fingers and anticipation. And finally, we have a third part which will give us some ideas on how to work on a full chords progression properly.
The Basics
Repeating
The key to learning a chords sequence, and generally to learn many things in guitar, is repetition. Repeating again and again the same movement activates a mechanism that is called « muscle memory » and that will enable us to reproduce the same movement with greater ease thereafter, virtually automatically. To be short, we want to develop automation, reflexes, just like when we learnt to write, tying shoelaces etc.
The problem with the muscle memory is that we absolutely need to repeat the proper motion. Repeating a wrong move is VERY bad because it will slow your learning. It is better not to work at all than not working properly.
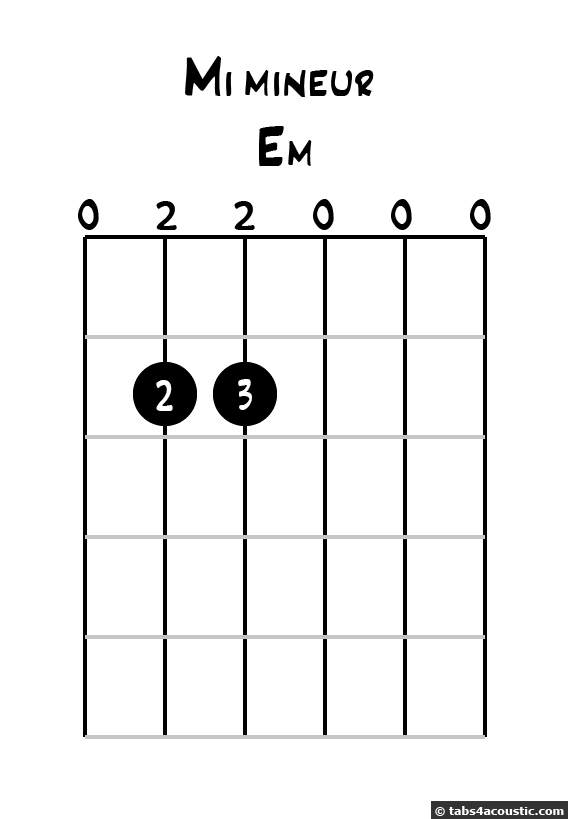
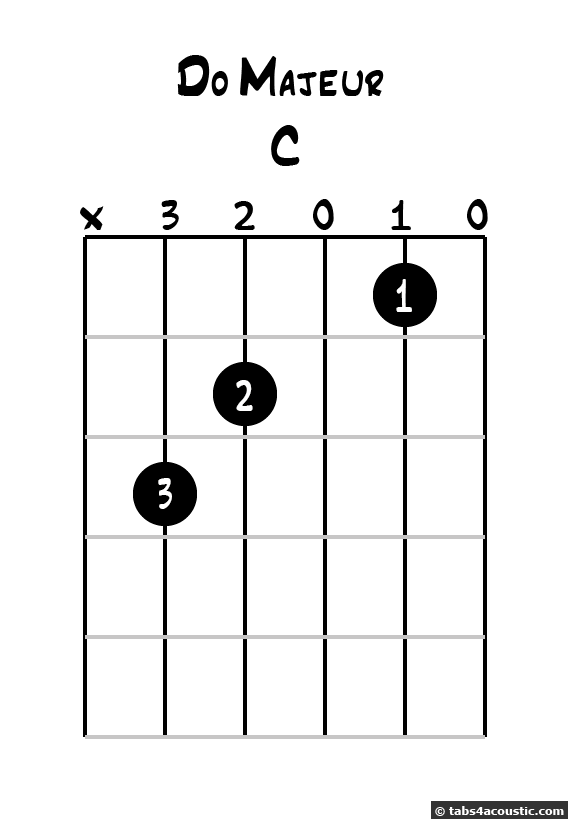
Of course, you are a beginner, and you may not yet be familiar with the right movement, and that's what we'll see in this lesson. Needless to say, it will be much more evident if you watch the video, since you will be able to see what to do. In the example shown on the video we will use two chords, Em and C, here are the diagrams:


Caution, do not try to chain the chords if you do not already know them. First, learn them correctly (see this course) before trying to chain them.
The proper movement
Now let's see the basic tips to detail the proper movement:
- Go slowly and focus on your left hand. If you go too fast and you miss your shot, you're wasting your time. You're not in a hurry so don't jump the guns.
- Try to identify the movement of each finger before playing for real. If you get to see the "trajectory" of each of your fingers, you will manage much better. Do not move a finger if you do not know where to go.
- The goal is to save the movement. Avoid unnecessary movement and try to take the shortest route.
- To help us save the movement and to gain speed later, try not to lift the fingers too high. Lift them just enough not so as not to touch the strings, but not more!
- With the goal of achieving a « perfect » movement, try to move all fingers simultaneously. Moving three fingers at the same time is for sure faster than moving one after another.
Of course, this is the goal, and as a beginner you will probably not reach it the first time. This is normal, a lot of practice will be required, so read on and you will find some exercises that will help you to improve all this.
Work the chords separately
First, the exercise to work the chords separately with the "fingers in the air" seen in the course about the chords can only be profitable.
Then, certainly, you won't be able to move all fingers simultaneously. And usually it's the ring or little finger (the « weak » fingers) that will be long to train. So start to really concentrate on the lazy finger, trying with all your strength to move it along with the others.
If really, despite your best efforts your lazy finger does not obey, reverse the trend: do the chord change starting with the weakest finger. You'll find it easier to catch a possible delay with a strong finger than with a weak finger. So reverse the trend, and run this ring / little finger!
The economy of movement
A final point to note, meant for those who make their deals without putting all the fingers simultaneously : do care about the economy of movement. If you can still not move all the fingers at the same time it is not dramatic, you will be able to do that later, nevertheless, always keep in mind the economy of movement. Watch the video for further explanation.
Let's summarize this a bit in a few words before we move on: the focus is saving the movement and trying to move all fingers simultaneously.
Practicing the chords change
Now that we have seen how to make a correct chord change, let's see how we will practice all this. The answer is simple: we choose two chords, we practice a few minutes (at least 2-3 minutes, maximum ... as much as you want!), and repeat this every day. After a few weeks, you will have repeated the same movement thousands of times, and you will then know it by heart! Then (or simultaneously), you can move on to other couple of chords, or even better, try to chain 3 chords, or more!
The problem is that there is a virtually infinite number of chords on the guitar. Should we work all the possible combinations? In theory, this would be perfect. In practice, it's just impossible. However, keep cool, if you work (for example) the chaining of C to Em, all future chord change from any chord to a C will be easier. First, the more you play your C the more you will play it well (assuming of course that you are working properly), and second, because the work you are doing on chaining chords develops your skills generally speaking, and it can only be a good thing!
Your question is probably: what chords should I work on ? Well it's up to you. You can choose chords of a song you like, you can take all the open chords, or only major chords, or only chords using the little finger. Simply choose the chords you want and work on them according to your needs!
A few tricks
Pivot fingers
In this second part we will see two essential tips to properly chain your chords: the pivot fingers and anticipation. Some of you will probably think it is a form of cheating, but don't be mistaken: everyone uses these tricks and you also will, if you want to become an accomplished guitarist. So, all you need to do now is start working on it!
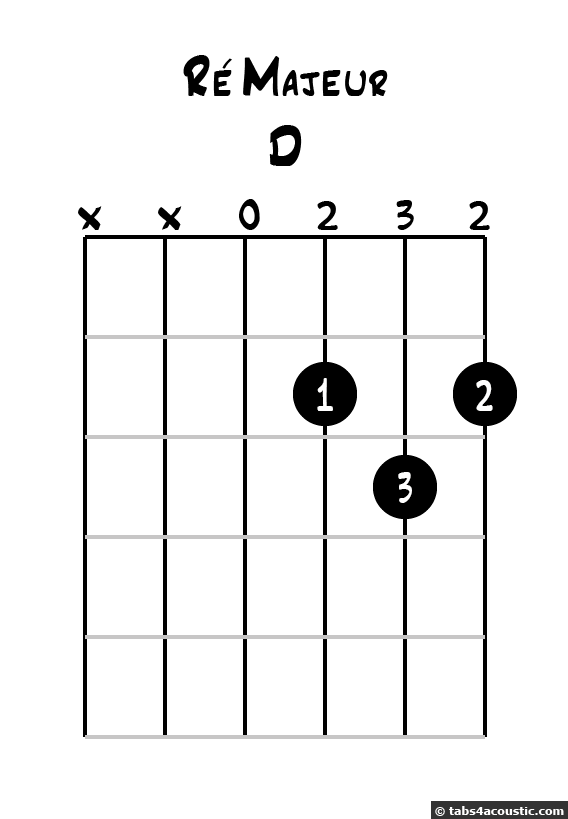
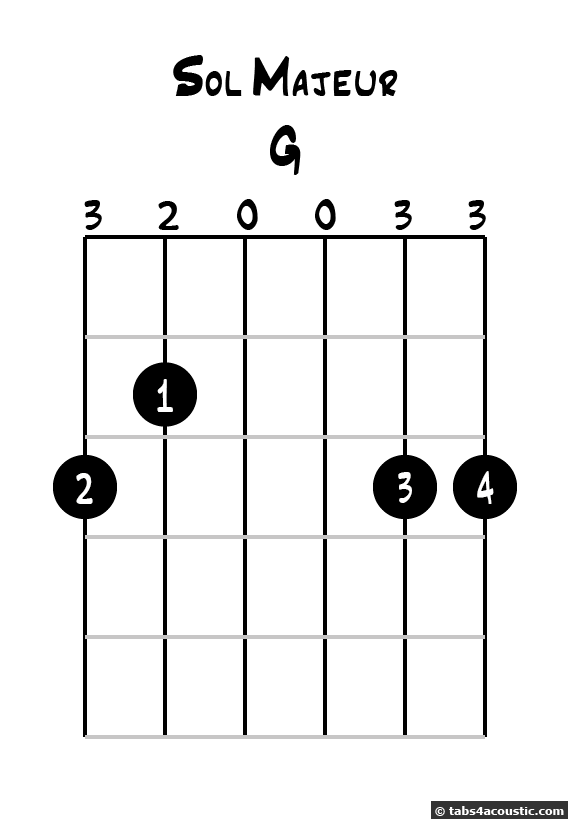
Let's start with the pivot fingers, and analyze the G and D chord diagrams so as to immediately see a concrete example:


(You'll notice I used the position of G major using four fingers, this is essential for this exercise)
If we look at all the fingers needed for these 2 chords, we have:
D major: first finger on the 3rd string, 2nd fret ; third finger on the 2nd string, 3rd fret ; second finger on the 1st string, 2nd fret
G major: second finger on the 6th string, 3rd fret ; first finger on the 5th string, 2nd fret ; third finger on the 2nd string , 3rd fret ; fourth finger on the 1st string, 3rd fret.
You notice that for these two chords, the third finger is placed on the same fret and same string. We call this finger the « pivot » finger. It is essential not to move this « pivot » finger when chaining these two chords, or any couple of chords that share a « pivot » finger. You may eventually slide slightly this finger on the string, if ever you need to add another finger very close to this « pivot » finger or if you need to stretch your hand to put another finger on another fret/string, but this « pivot » finger shall never leave your string. This « pivot « finger will give you great stability, which will significantly help you to move the other fingers. Moreover, removing it from the string to put it back at the same place would be a waste of time and energy.
So learn to identify « pivot » fingers, there may be several. Then analyze your chord diagrams before trying a chords sequence. And if you have the choice between several fingerings, always choose the fingering that allows you to have a « pivot » finger.
Anticipation
Let's now speak about anticipation. It's a concept which is a little more difficult to explain, since it would need a minimum of rhythmic knowledge, but I will try to explain this with simple words for the very beginners.
First why is anticipation useful? Well, simply, we can work on our chords with all the tips listed above, and do this for years, we will always have a speed limit that we can not overcome. We inevitably end up facing a song that requires us to chain our chords too quickly, or a song that is simply too difficult to play because of too complex chords sequences, even at slow speed. Thus, we'll cheat a little so as to ease-up those chords changes.
Generally, when playing a song including several chords, we will play a strumming pattern on each of these chords, sometimes the same one or sometimes a different one. This strumming pattern is composed of up and down movements of your right hand. At the end of the strumming pattern, we must change chords, and the time we have between the last strum for the first chord and the first strum for the following chord is more or less short.
Therefore, in order to have more time to change our chord, we will play the last strum 'open', that is to say removing all the fingers of our left hand from the strings. The strings that are strummed « open » may sounds wrong, but if we do not accentuate this strum played « open », this will not even be noticeable among all the strums that are not open.
Beware though, it requires that both hands are synchronized. If you lift your fingers too early, there will be too many strums played open, and if you lift your fingers too late, you will not gain enough time. Moreover, it is imperative that the fingers are either fretting properly or removed. No half fretting is allowed, the string will not ring nicely.
Last important thing: I told you to lift your fingers early enough, to give you more time to change chords. If you do not take advantage of this moment to move your fingers to the new position, all this work will be useless. And to stay clean and not pick the strings that are half-fretted, you will place your fingers "in the air » just above the string as explained in the course on « playing chords for beginners ».
To work this on well, you must break down the movement very slowly. Take two chords (which you already practiced) and apply the following sequence of movements without trying to go fast or to be regular at the beginning:
- strum down the first chord
- remove the fingers and strum up
- in the meantime, place your fingers « in the air » so as to prepare to play the next chord
- put the fingers down on the strings to play your chord and strum down
- repeat again and again
Be sure to really be clean, synchronized, and once you are comfortable you can accelerate gradually and be more regular. Once this work done, you will only need to integrate it into a full strumming pattern.
Obviously, this trick of anticipation does not replace the work seen in the first part. It is just there to help you to go a little further in your abilities.
How to work a chord grid
In this section we will analyze a chord grid to determine where to start. This grid is pretty basic, and inspired from Knockin 'on Heaven's Door. It contains the chords G D Am C. I will not show you again the chord diagrams, because it is useless to go further if you do not already know them!
Play without rhythm
The first thing to do is play the grid entirely, once, very slowly, without rhythm or regularity, just to see all the chords you will be facing. Then you should immediately start to analyze the chord changes, identify the most difficult to find the pivot fingers, and do not forget to chain the last chord with the first! Beginners often tend to stop at the end of the grid, but you must not forget that if you want to play the whole song, you'll have to chain the grid many times, without any holes.
Once the grid "analyzed," we work the chords by taking them two by two, starting with the hardest. It's the chord changes that are the most difficult to do which will slow you down and prevent you from playing the song at the right speed, so you need to work on them in priority. Once you have worked on your chords independently, and that you are doing pretty well, we will replay the full grid but with a rhythm now. However we will start very simply, we will just play four strokes down with the right hand on each chord, remaining as regular as possible. The goal is not to go fast or make a great rhythm, the aim is just to be able to play the entire sequence at the same speed, without slowing down, no downtime, no mistakes. If you can not do it yet, go back to work the chords separately.
You can also start to work anticipation at this stage, if you think you'll need it: instead of normally playing four strokes down on the difficult chord sequences, play only three strokes on the chord and the last one, play it open. Remember to ensure cleanliness and synchronization of both hands, it is essential in order to get a pleasant result for your ears.
Continue to work without rhythm, again and again and again, make sure you remain regular, and speed up gradually. If you can not play the grid with "only" four strokes down with the right hand, you will not be able to do that with a more complex rhythm.
Add a strumming pattern
Once you're comfortable with the full grid, add the real strumming pattern to the right hand. Of course, you are free to add the rhythm earlier (by playing more slowly, for example), but be very careful that the work of the right hand does not hinder the work from the left hand. Do not be too eager to make complex rhythms.
That's about all there is to know about how to correctly work on a chord grid. Do not jump guns, if at any time you lose consistency, or cleanliness, rewind, slow down again, or rework on the previous steps. All these steps should also be reworked every day, at least when you are a beginner. Do not overlook the work to be done in the first steps.
Use this method on all simple grids, that you like, and work one chords grid for several weeks. Do not expect to succeed in two days. It will take you a few months / years instead.


