Blues for beginners
Prérequis pour ce cours : How to read and play chords for beginners, Practicing chord change,
Travailler ce cours : Aucun
Welcome to this guitar lesson devoted to blues for beginners, where we will learn to play our first blues piece in several ways. For this, we will first learn about the concept of the blues grid with a concrete example, the 12-bar blues. Then, in the second part, we will see some chords for beginners to play blues music. And finally, the third part will focus on some electric riffs to make everything sound more like blues-rock.
The blues grid
The chords Grid concept
Before we start, you should know that the blues is not a music that is played strictly as written; the big majority of what is played is improvised. So, to avoid a big mess and in the perspective that all the musicians play the same thing, we will follow a harmonic frame, a kind of breadcrumb that will guide the group. This frame is defined by the term "grid", especially the "blues scale" since we're talking about blues.
A blues scale can be played with lots of different chords, riffs, arpeggios or many other ways. Different tempos can also be used, with different moods, in different styles of music. So chords can be played very freely, and this is what makes the blues so rich.
As the blues is a very broad style, there are lots of different blues grids, and lots of different variations of the blues grids. Today we will focus on only one blues scale, the most famous one, with a very common variation also. This grid is better known as the "12-bar blues".
It should be understood that blues scale is an abstract concept, it tells us what to play, but not how to play it.
Degrees
Before going into the grid itself, it is necessary to know the concept of scale degrees so that everything makes sense. By convention, the degrees are marked as Roman numerals, and are used to represent a note in a scale.
For example, in the C major scale that everyone knows (C, D, E, F, G, A, B, C), C is the first note, so it's the first degree. D will be the second degree, third degree is E etc. . But in the D major scale (D, E, F#, G, A, B, C# , D), the first degree is D, the second is E, the third is F # etc. .
The advantage is that a grid with degrees rather than notes will apply to any key if you know the notes of the scale. So, if we decide to play a "Blues in E", we will use the E major scale to find the notes corresponding to the degrees.
If you do not understand all this, it will still be okay for this lesson, we will simply play the blues in A and I will give you everything you need to do so, but sooner or later you will need to understand this in order to play the blues on different keys! If you want more details, start by visiting the course on harmony, then the one on the major scale!
Our first blues progression
We'll start by learning the "generic" 12 - bar blues grid without key nor notes, as follows:
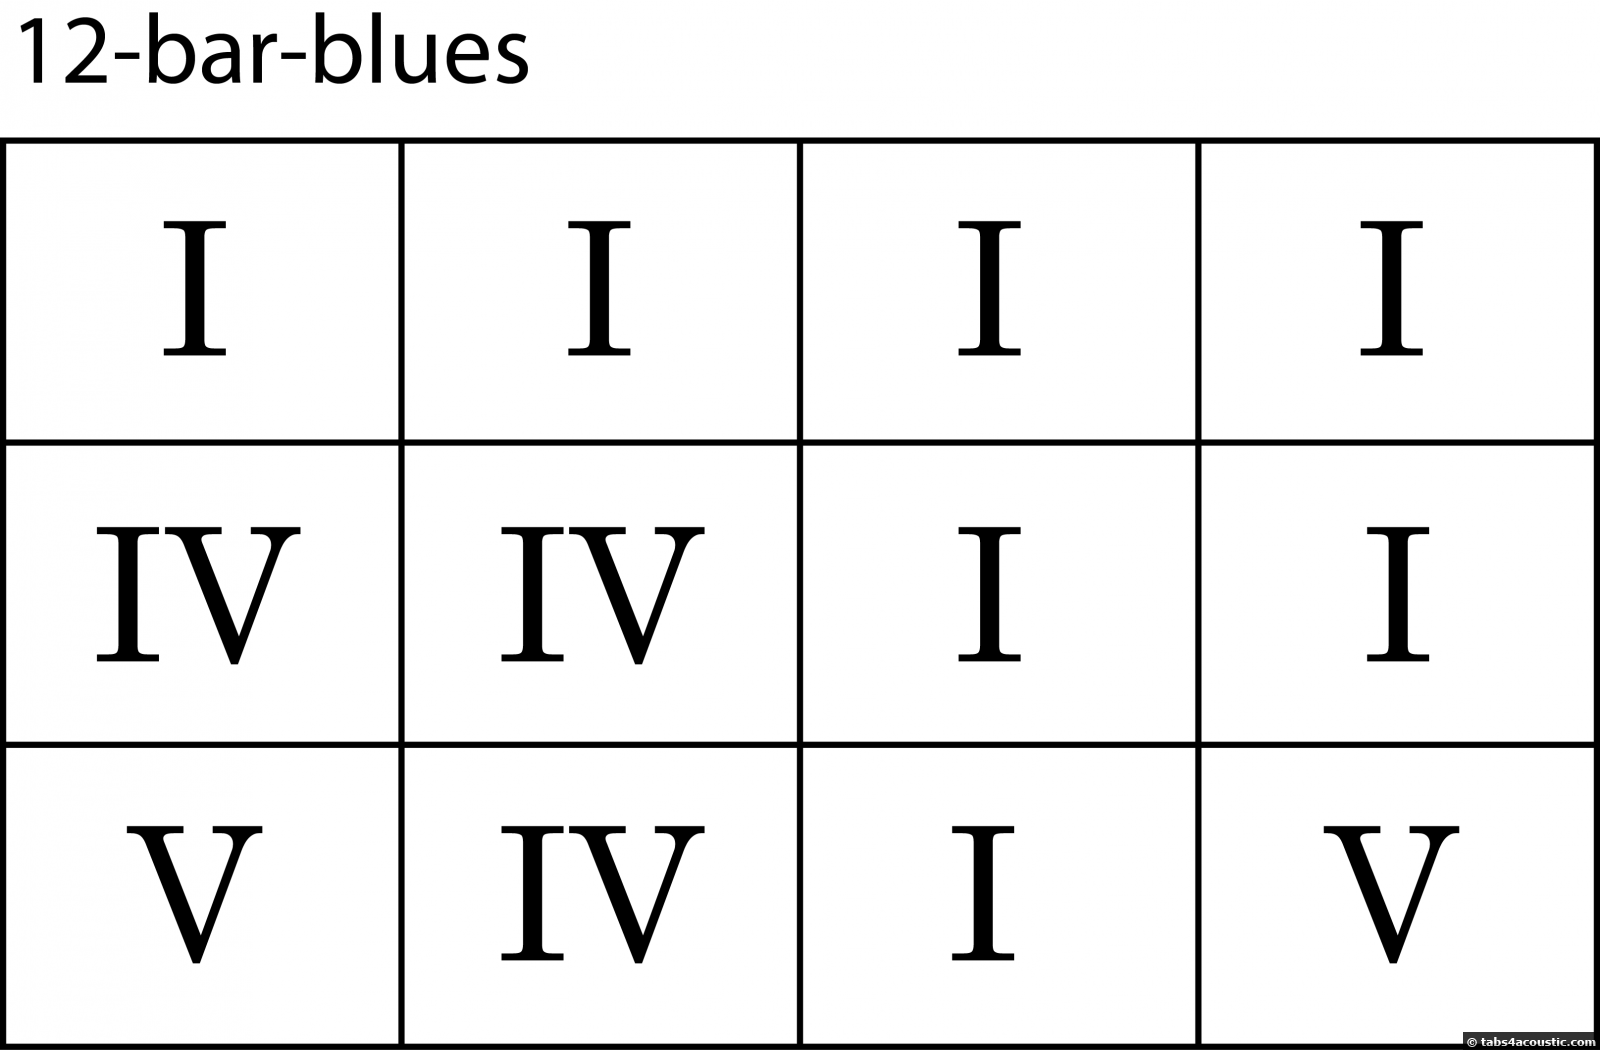
As you can see, it is composed of 12 bars, which are commonly split in three lines of four bars. The first line is composed of four bars of degree I, then we have two bars of degree IV and two bars of degree I for the second line and to finish, the last line is composed of degrees V, IV, I and V.
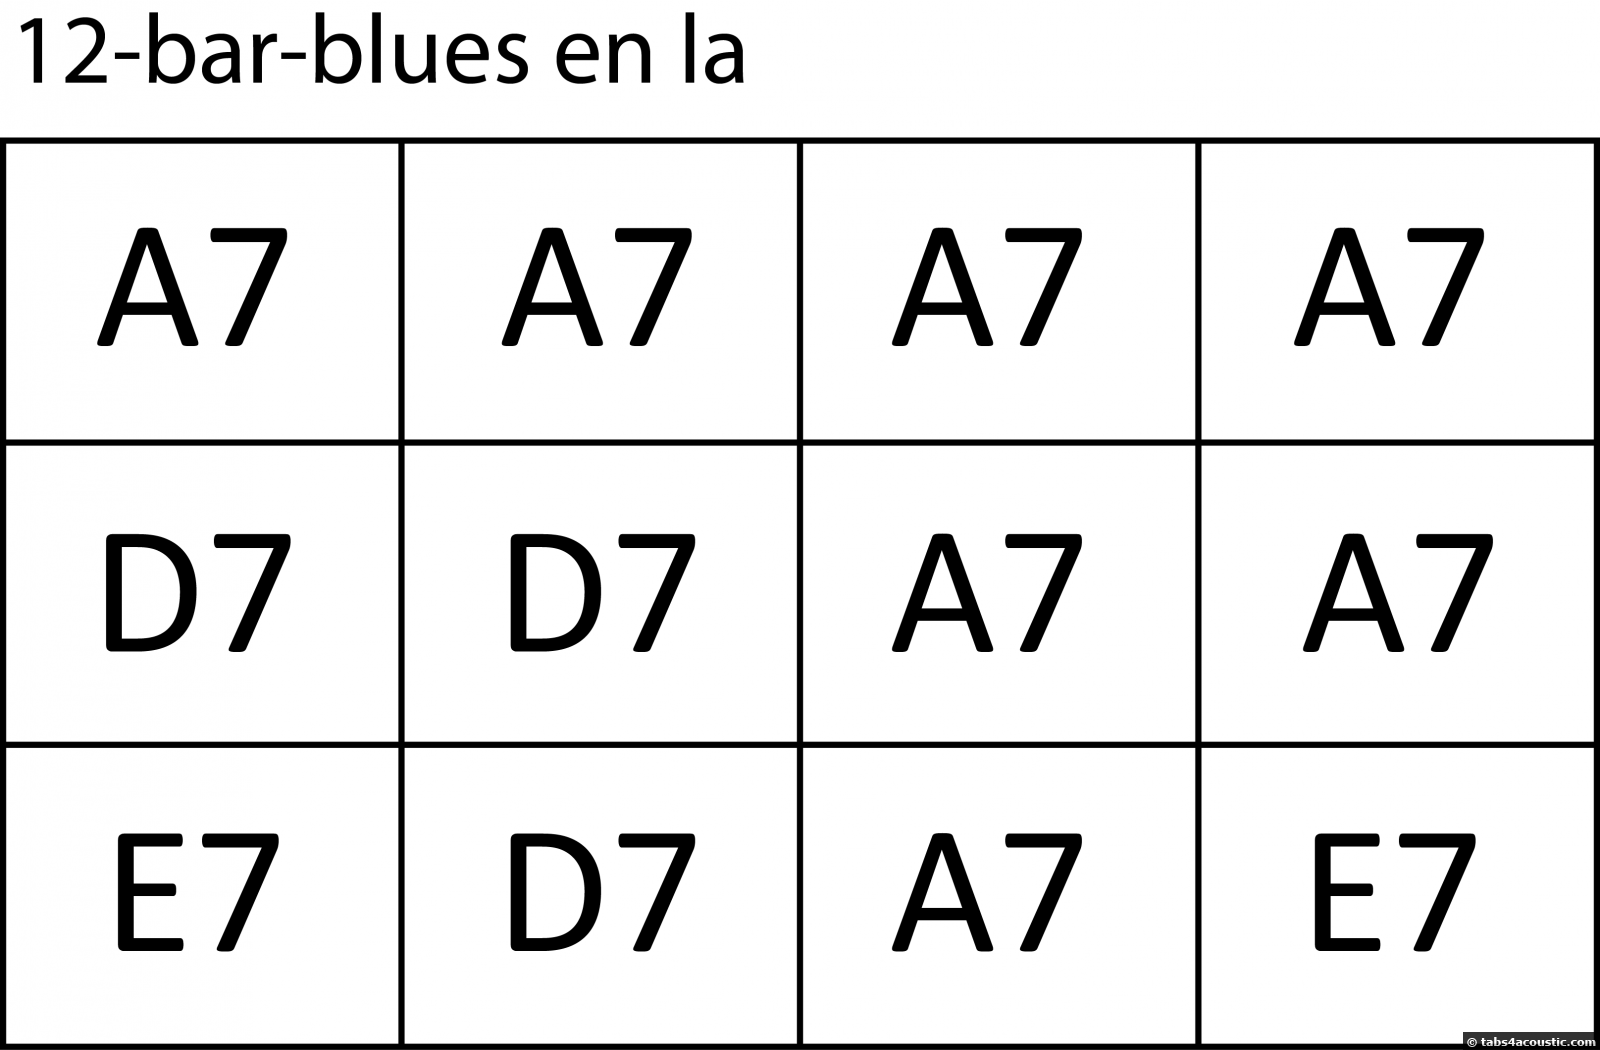
We will now apply this grid in the key of A major. For this, I give you the notes corresponding to the degrees of the A major scale :
- Degree I = A
- Degree IV = D
- Degree V = E
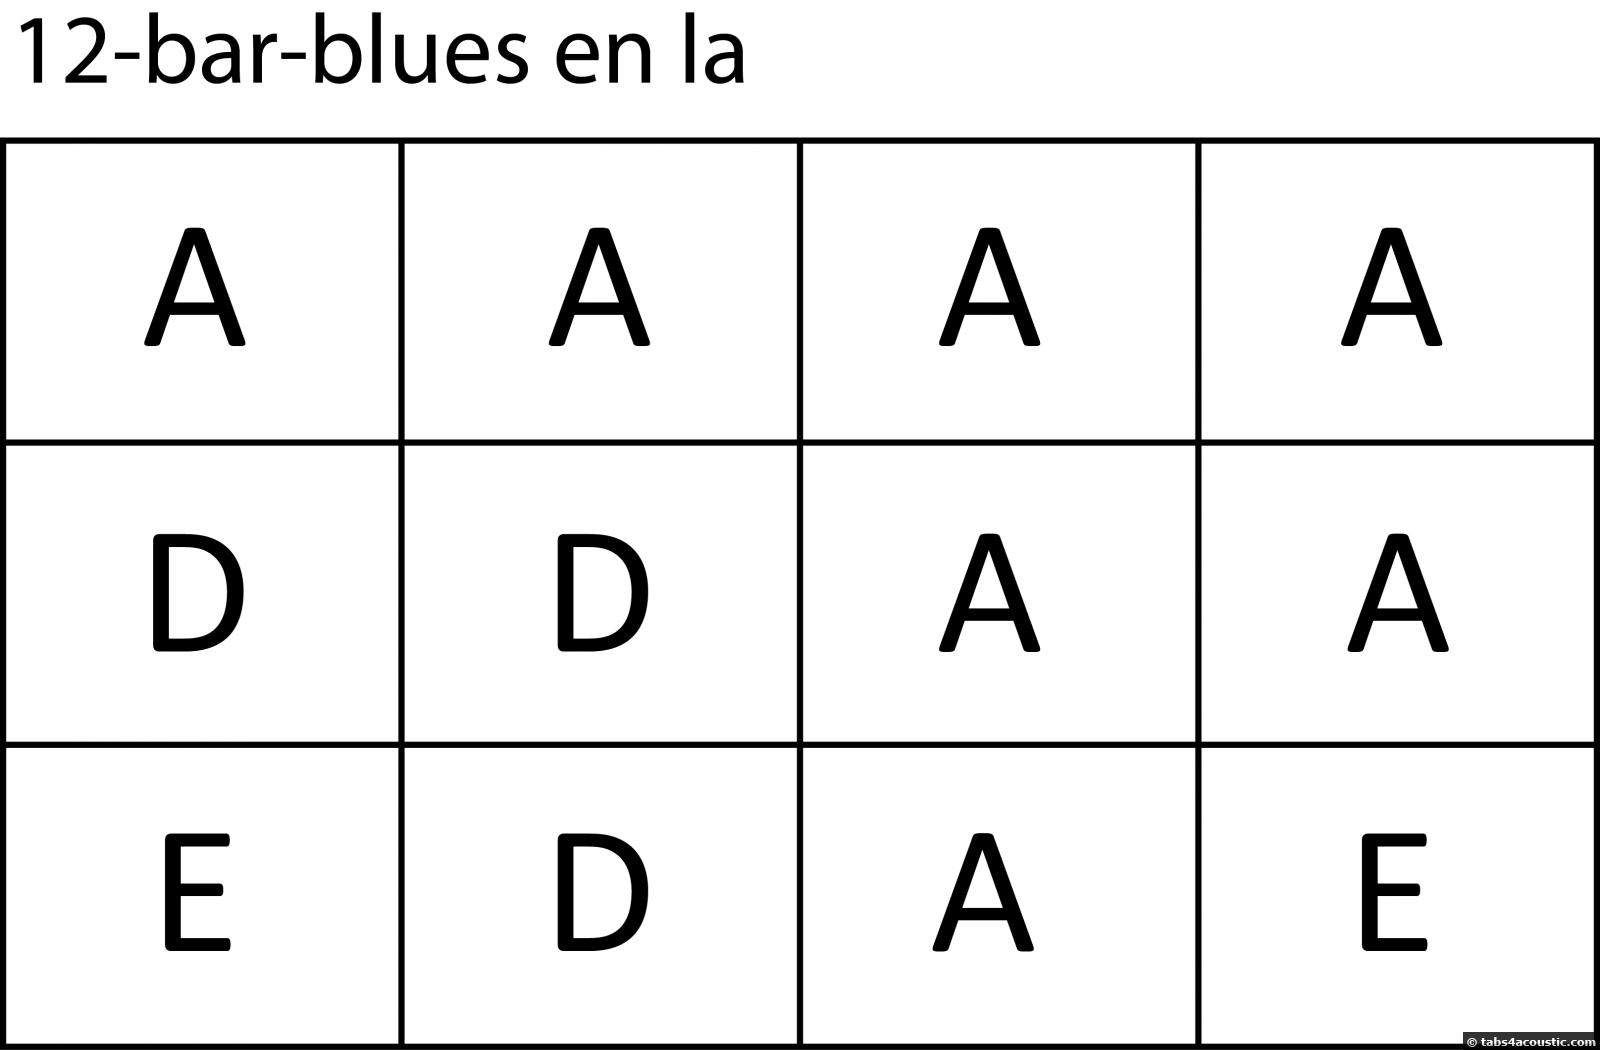
So if you want to rewrite the blues grid with these notes, you get :
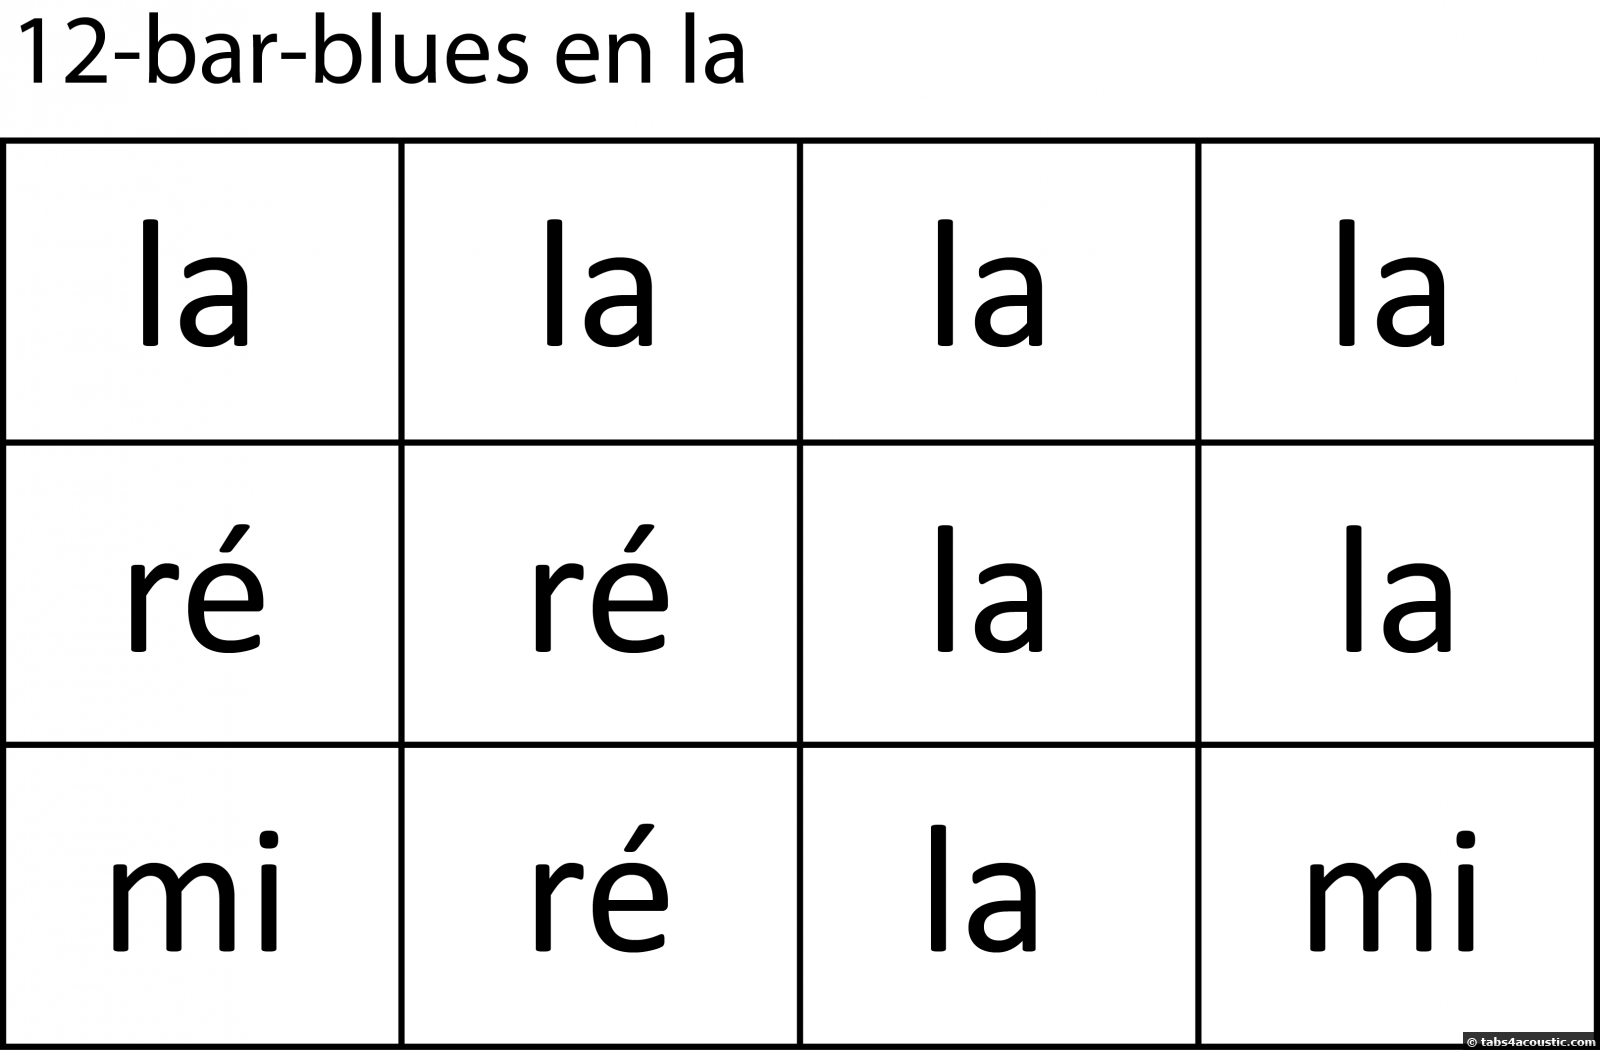
But it still doesn't tell us how we're gonna play it all, and for this, we will go to the second section of this lesson to see which chords can be applied to the grid, and in the third section to learn some riffs that sound more rock.
Bonus
Before we move forward, I'll finish this first part by talking about a very common variation on the blues grid, and some vocabulary.
The Turnaround
It refers to the last two bars of a blues grid (the I -V). It is very commonly used by all musicians, so remember this word.
12-bar-blues : a little variation
There's a 12 bar blues grid that is very common and often used, that's why it is useful to mention it now. It is quite simple to apply: simply replace the second bar of the 12 - bar blues (normally the degree I) by a degree IV, then go back to the degree I in the third bar. So we get:
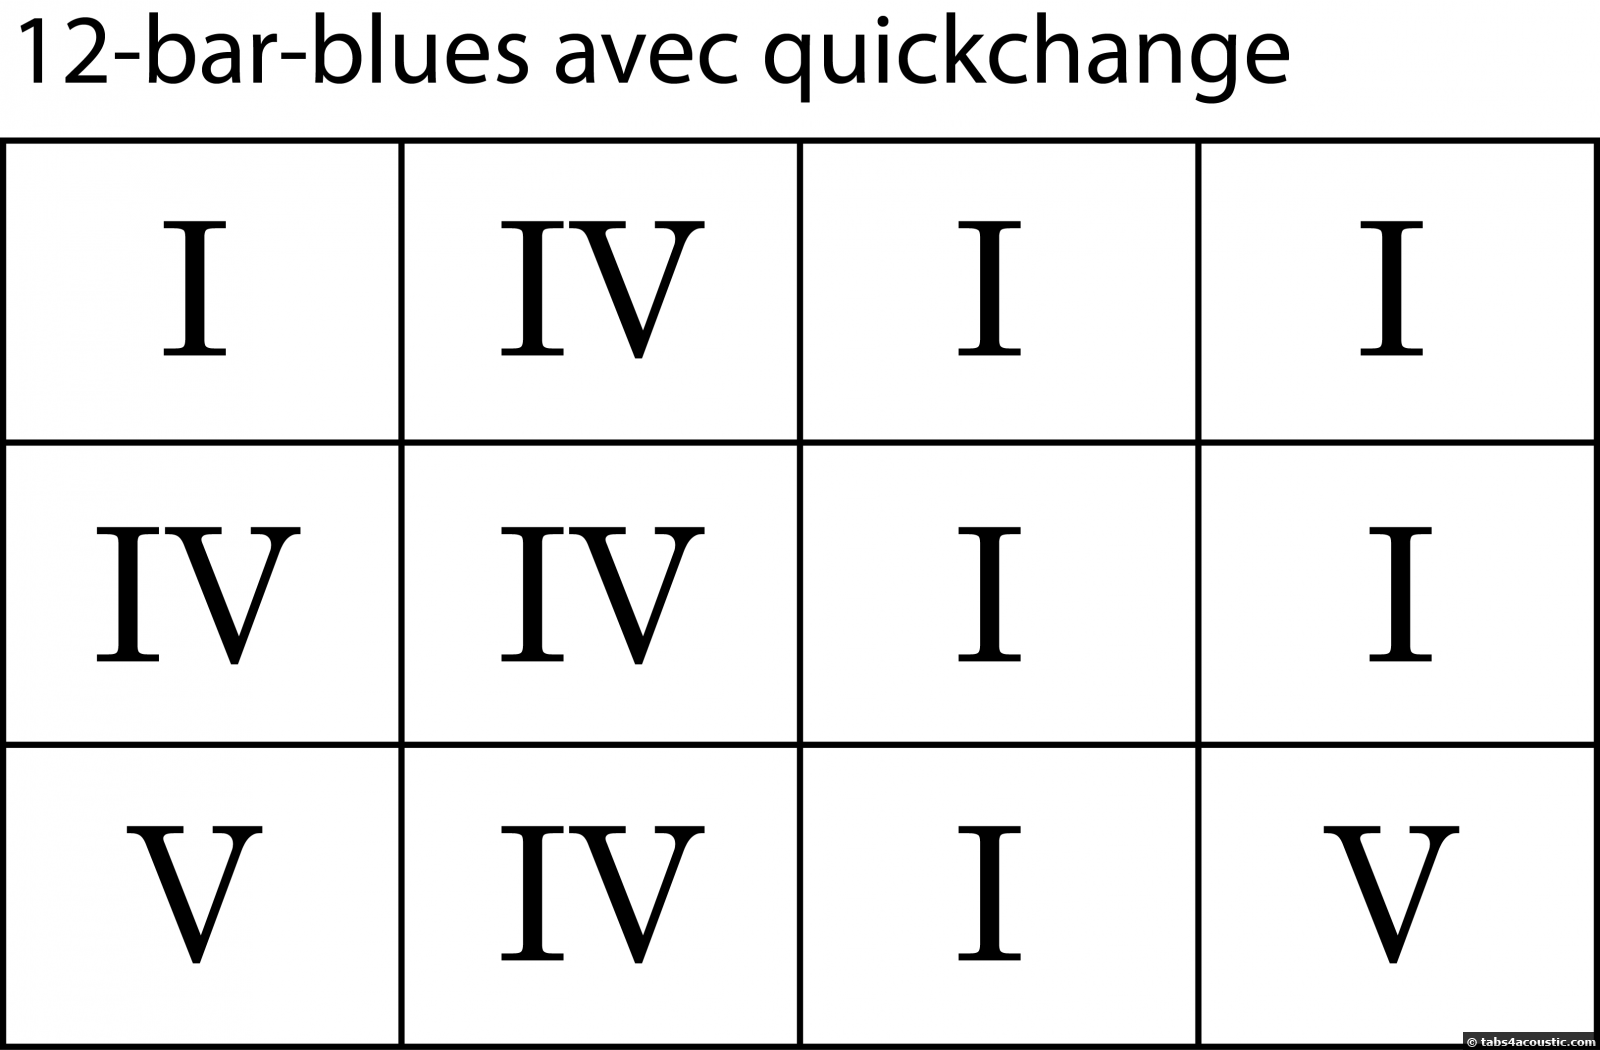
It breaks the monotony of the beginning of the grid, and it is aptly named "quick variation."
You are now ready to move on to the next section to learn a few chords or directly to the third part to learn some riffs. If you have any doubts about the understanding of the first part, do not hesitate to read it all again and review the video before you move forward!
Chords for beginners
Major chords
Now that we've seen the blues grid, we will change the notes into chords. And as the blues is a highly improvised music, there are lots of different chords that can be used in blues. So, since we can not make an exhaustive list, we will start with the simplest: major chords.
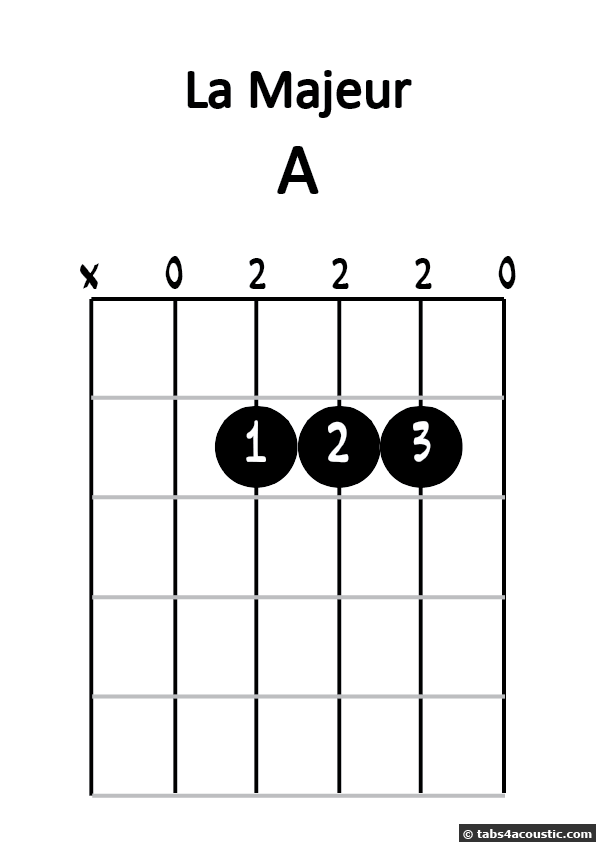
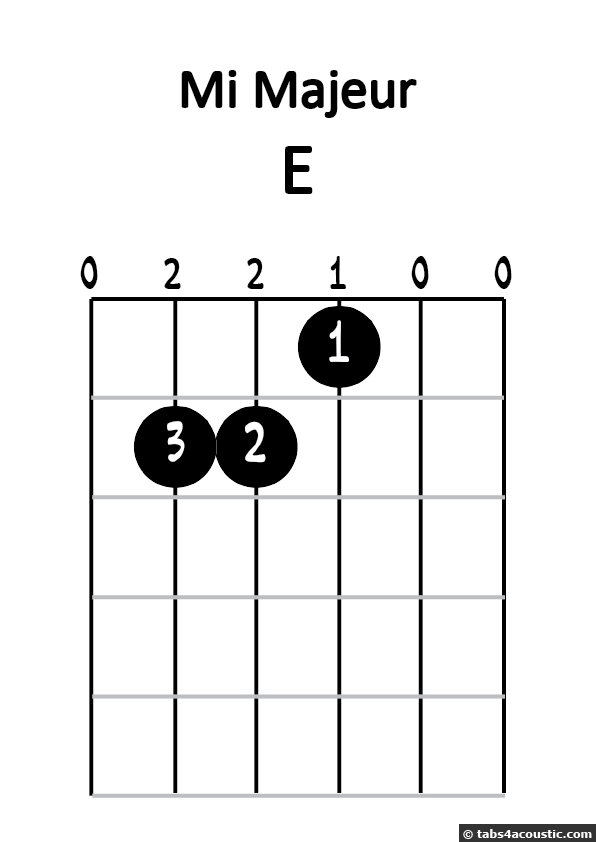
So, our blues grid (consisting of degrees I, IV and V) and therefore containing the notes A, D and E, will be played with the major chords of A, D and E. That is why we start first with the blues grid in A, because these three chords are open chords, which is not the case in all keys. Here are diagrams of these three chords, in case you don't know them by heart yet:
And the grid with these chords becomes:
How about the strumming pattern?
Obviously, if we speak of chords, we must ask ourselves: what rhythm pattern are we going to use on these chords? Well again, like many other things in blues, you are free to do what you want. Each bar containing 4 beats, any rhythm pattern based on 4 beats will be appropriate. If you are not very comfortable with the rhythm, just play four downstrokes for each chord. The "campfire" rhythm pattern also works very well on this grid, and this is the one I used in the examples of the video. Feel free to watch the video (second part from 4:00) to hear how the blues grid sounds.
Dominant 7th chords
As you can see (if you watched the video or if you tried at home), this does not sound very blues . It is closer to a country music sound, but it allows us to familiarize ourselves with the blues grid without caring about chords we don't know yet. Now let's see what chords we will use to play real blues.
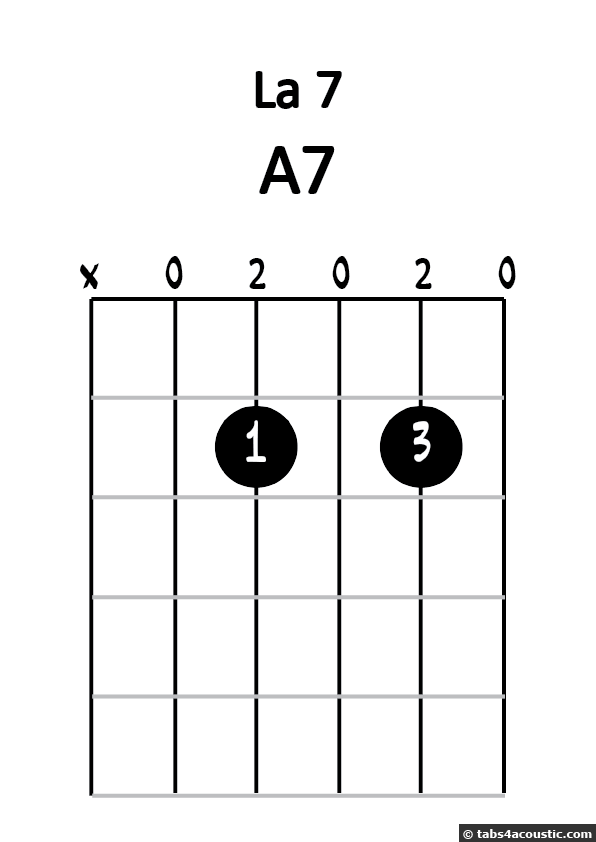
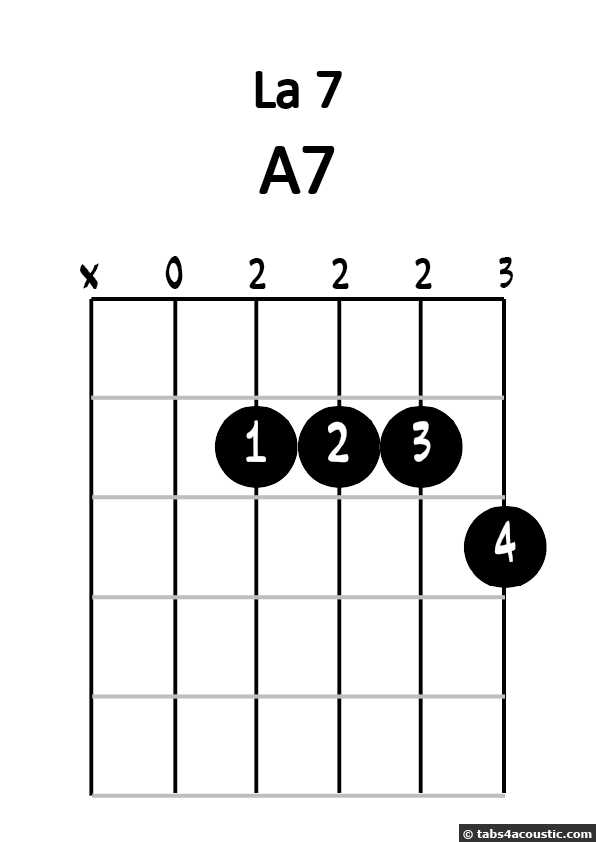
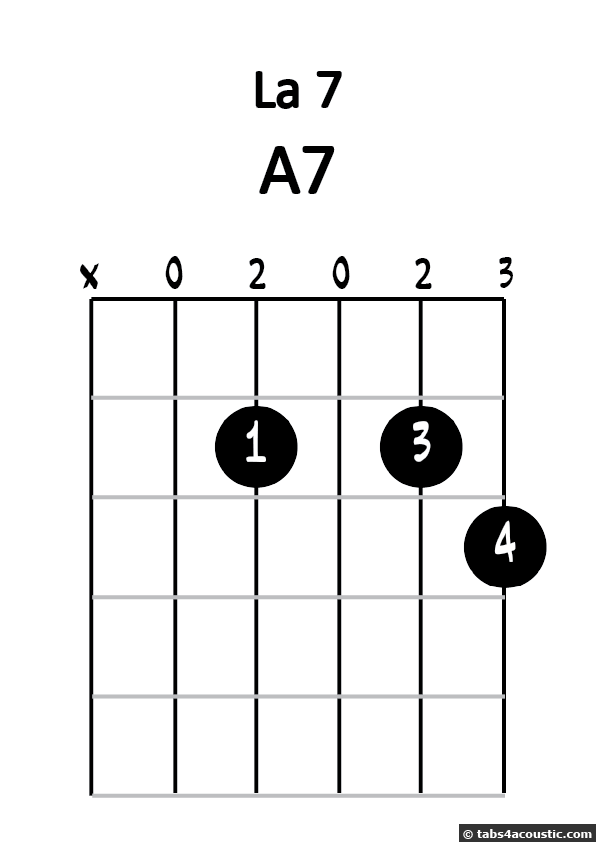
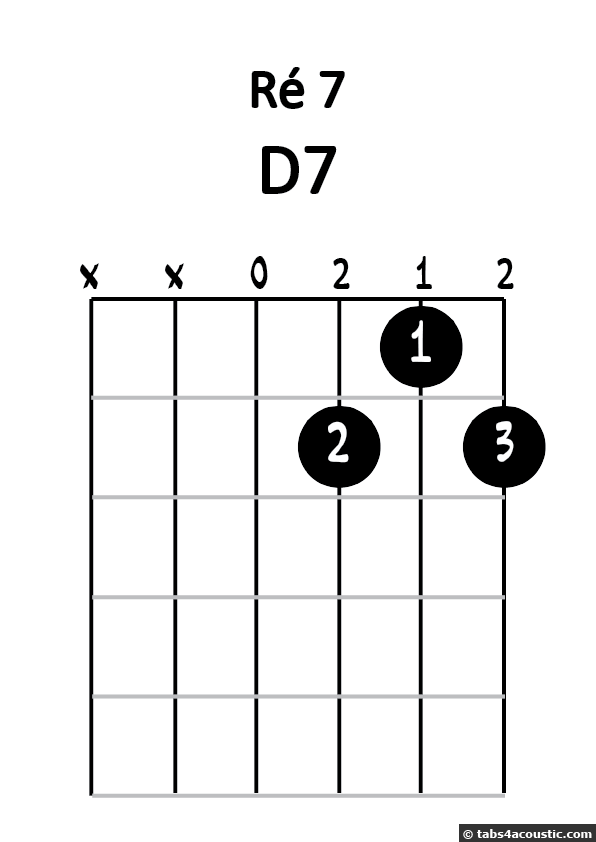
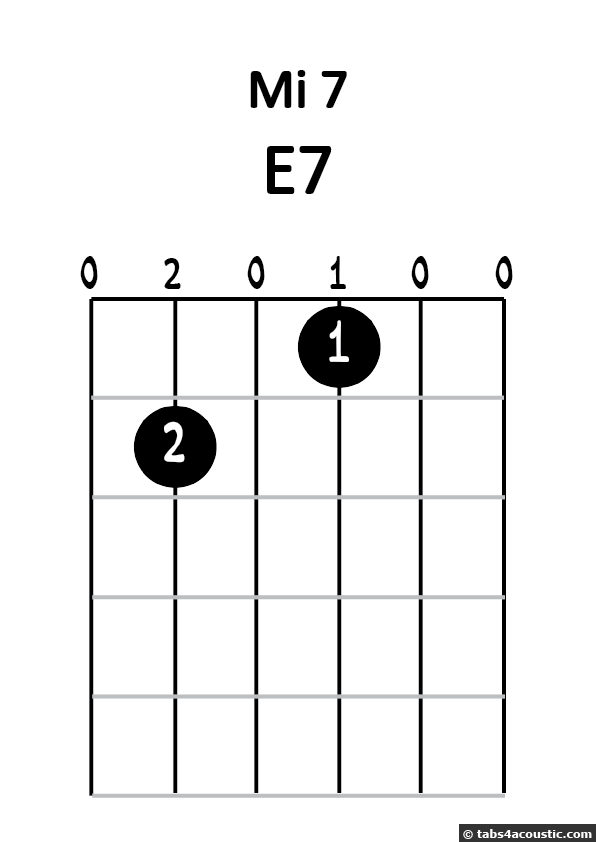
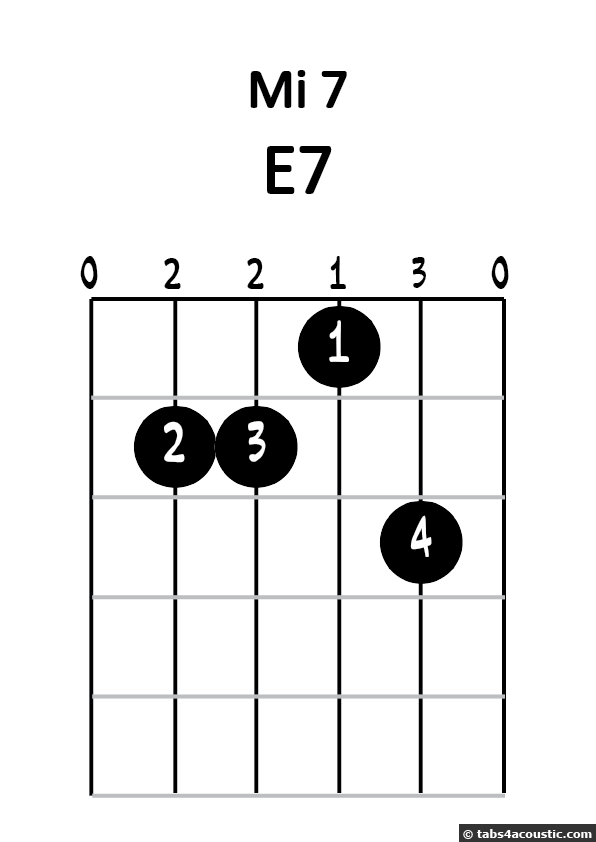
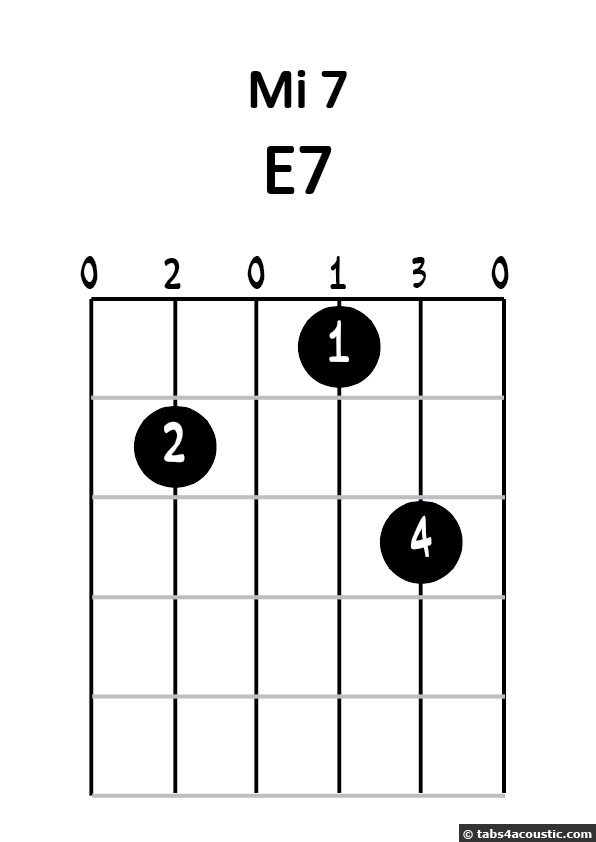
We will learn about the chords called "dominant seventh". The name is scary, but they are simply written A7 D7 (and it is commonly pronounced A seven, D seven etc...), and (for those who are curious about harmony) they are composed of a base note, a major third, a perfect fifth and a minor seventh. The fingerings of chords A7, D7 and E7 (which we need for our blues) are not much more complicated than the fingerings of major chords, but you may not be familiar with these chords yet, and you will probably need a little more practice before you know them by heart.
Let's start with the A7, for which we have several options:
-
the first option: we start from the A major chord , and we lift our medium finger, to let the G string ring open:
-
second option: we still start from the A major chord, but this time we add a finger on the high E string on the 3rd fret:
-
last option: we can combine the two former options: put a finger on the 3rd fret of the high E string AND remove the medium finger in order to have the G string open:
For D7, if we want to use open chords, there is only one possibility:
For E7, just like the A7 we have several possibilities:
-
Start from the E major and remove the ring finger so as to have the D string open :
-
Start from the major E but this time, we add the pinkie on the B string on the 3rd fret:
-
and finally, we can combine the two possibilities :
As always, you are free to choose the fingerings you want in your grid, or even to mix different fingerings: you are free to play the blues as you like. And if we rewrite our blues grid with seventh chords instead of major chords, we get the following :
Like for the major chords grid, you can hear how it sounds with several fingerings that are mixed in an example in the video (from 9:06). You will hear immediately that it sounds bluesier with seventh chords than with major chords.
Explore it all!
All this of course is very basic, but you already have a lot of possibilities. You can change the tempo, or the rhythm pattern, or chords fingerings. You can even mix major chords and seventh chords (but beware if you do this: always use a seventh chord at least for the degree V (the E7 if you are in the key of A), otherwise it won't sound good).
Anyway you now have all the basics to play the blues. And for those who would like to do something a little more electric and rock, let's go to the third part!
Blues/rock riffs
In this third part we will learn to re-interpret the blues grid we talked about in the first part, but with riffs that sound blues-rock. These riffs will sound great on an electric guitar with a little distortion, but nothing prevents you from playing and working on an acoustic guitar.
However, we will approach this differently, including on the rhythm pattern side. When we play chords, we are usually quite free to use the rhythm pattern we want, as long as we remain in the tempo. On the contrary, the riffs rhythm will be defined in advance and cannot (or not much) be changed. Do not panic, the rhythm is simple to play.
Our first riff
The right hand
The riff lasts one bar, and contains 8 eighth notes, all played with simple downstrokes. However, as you can see, there are only notes played on the two lower strings of the guitar. So, the main difficulty is to play these two strings ONLY.
The left hand
If we have a closer look at the tablature, we realize that the low E string is played open throughout the riff, so you don't need any finger for this low E string. On the A string however, we will play two notes on the 2nd fret, two notes on the 4th fret. Try to use the index for the 2nd fret and the ring finger for the 4th fret.
Théory
For the purpose of this course and make the link with the chord grid seen in the first part, we will analyze our little riff. You can notice that the lowest note of the riff is the E string played open so you know that this is the note E. In this case we can say that this is a riff in E. Be careful, this is a shortcut that is not always true and it hardly applies outside of this course. Note that in our earlier blues grid, the degree V was a D.
In the Blues grid
We know now that we can play the degree V with a riff rather than a chord. Good thing, but how are we going to do for degrees I and IV? Well, we will just shift our riff in order to use the A string (for degree I) and the D string (for degree IV) as the lowest string. You do not understand?
Well this is what happens in A:
and in D:
Now the only thing we need to do is play the riffs in A, D and E in the correct order, i.e. following the blues grid. Again I suggest you watch the video (at 3:55) to see everything properly played.
Practice!
If you are a beginner, there is a good chance that you don't succeed the first time. You have to play the right notes with the left hand, change strings at the right time, and target the right strings with the right hand while still maintaining the rhythm. So there is some work to be done to successfully play this blues grid this way.
I advise you to learn the riff by heart, to manage to play it on any string, and to play a series of this riff on different strings, in no particular order. If you are able to do this properly, and in rhythm, the only thing that is left is to learn the blues grid order and you'll be all set!
Go further
Remember that this first example is basic, and there is plenty of scope to improve the result. First thing to do is to try to get different sounds by varying the right hand stroke, or palm-muting, or changing the sound of the amp etc ... but we will speak about all this in another course.
Just like we saw several different chords in the second part, we will be able to play different riffs just to break away from the monotony. Just be aware that there are probably hundreds of different riffs, and therefore you will not get an exhaustive list here.
Someexamples
Examples of riffs that you can learn. They are all E, but you can shift them all to A and D in order to play the full grid with these riffs.
These three riffs are very similar to the original, we still have the E string played open and only the notes of the A string that change. But there are some riffs that change this pattern, like this one:
If you have some trouble reading these riffs or if you just want to see them played, watch the video from 6:00 to 8:20.
Next?
Once you have worked on all these little riffs and have transposed them on the A and D strings, you can play the entire grid with these blues riffs. You can take only one of these riffs for the entire grid, or play different riffs in series in the grid to vary a little.
Combine riffs
You may have noticed that some of the riffs that I showed you only last 2 beats which are repeated twice in a bar. So nothing prevents you from cutting these riffs into two halves and combine them. Here's a small example:
+
=
See? We created a new riff, and there are tons of other possibilities. Do not hesitate to try them all when you start getting bored.
Change the tempo
I said at the beginning of this section that riffs are played following a specific rhythm pattern unlike chords where you could use almost any rhythm pattern you like. However, we can vary the tempo because a blues played very quickly and a blues played very slowly will give two very different results.
And for those who have some knowledge in rhythm, especially in shuffle, try playing these riffs in a slow shuffle rhythm, you will discover a world of new possibilities. And if you have no idea what the shuffle is, you will not find the answer in this course!
Conclusion
Here we come to the end of the course on the blues for beginners. I hope that you have understood everything, that you remember that the blues is primarily a 12 bar grid, and also that it gives lots of possibilities for interpretation. I hope that you will train diligently and you will have fun playing this!
And if you want, you can always create a blog to share your bluesy experiences!


